Liquib Masks
 A
A  button is available on Edit Tools to toggle Masking on/off (or type
the / key). When Mask is enabled, the current screen image will be
combined with a Background according to parameters set via the
Mask Options screen. The
Mask Background can be either a solid color or an image. The
Background area is defined by either a pre-defined Shape or a
Stencil, which is usually a grayscale image. The static Mask
Background will appear in the
button is available on Edit Tools to toggle Masking on/off (or type
the / key). When Mask is enabled, the current screen image will be
combined with a Background according to parameters set via the
Mask Options screen. The
Mask Background can be either a solid color or an image. The
Background area is defined by either a pre-defined Shape or a
Stencil, which is usually a grayscale image. The static Mask
Background will appear in the 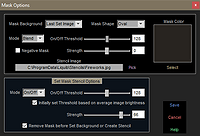 darker portions of the Shape or
Stencil, while the changeable image shows through the lighter areas.
(This is reversed when the Negative Mask option is set.) The
Mode parameter determines how the Background will be merged into
the display; either On/Off to cause distinct areas, or Blend to mix
the Background translucently with the display image. The
Strength value controls the relative contrast between areas.
darker portions of the Shape or
Stencil, while the changeable image shows through the lighter areas.
(This is reversed when the Negative Mask option is set.) The
Mode parameter determines how the Background will be merged into
the display; either On/Off to cause distinct areas, or Blend to mix
the Background translucently with the display image. The
Strength value controls the relative contrast between areas.
The Set Mask Background Image option can be used at any time to capture
the current screen display as the Mask Background Image. Then when
Mask is enabled, the Background portions of the screen will be filled
with that static image, while the rest of the screen can be altered with
Liquib manipulations, or perhaps different source images are loaded.
Essentially, this allows two completely different images to be merged, according to
the current Mask Mode, either On/Off or Blend.
Set Mask Stencil/Background and Set Mask Stencil/Background Negative
options are also available to simultaneously: 1) Convert the current screen
display into a Stencil, based on its light/dark areas, and then set that
Stencil as the Mask. and 2) Also set the current
screen as the Mask Background Image (the same as using the Set Mask
Background Image option described above). The effect of these actions is
to cause portions of the image to appear frozen and floating over the variable,
changing, non-background areas of the screen. This can produce some very
interesting results. The Set Mask Stencil Background choice will freeze
the darker portions of the display, while the Negative version will freeze
the lighter areas.
 NOTE: The
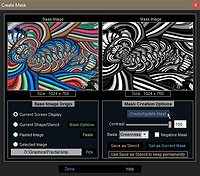
Create Mask screen
provides more flexible options for building a Mask based on the current
screen display, as well as other images. It also makes it possible to save
the resulting Masks permanently as Stencil Images.
NOTE: The
Create Mask screen
provides more flexible options for building a Mask based on the current
screen display, as well as other images. It also makes it possible to save
the resulting Masks permanently as Stencil Images.
Mask actions can be captured in Scripts, and later revised via the Script Control
and Editing screen. Random Masking can be applied during
Automatic Effects, according to
options set in the Automatic Effects Configuration screen.